This one is for all the MS Access geeks out there who, like myself, are not intimately familiar with all of the super-secret methods the Builders Of Microsoft Templates use to get that high-class finished look. I searched online for a while trying to figure this one out until I found a solution buried in a forum somewhere. I wish I had bookmarked it, because now I can’t find it again. But I feel like this little trick deserves to be in a spot not buried by the internet. (Which of course presumes that this blog is not one of those places. That might just be wishful thinking.)
 Ever notice, after downloading and opening up one of the templates available in Access, that the forms have this really snazzy beveled bump at the bottom of the form header? This is where the buttons sit, and it gives the form that little bit extra that say “monkeys didn’t throw this together”. Ever try to figure out where the bloody blue blazes that bump comes from? I did. I spent way too long trying to figure it out. Maybe I’m just slow on the uptake, but I couldn’t figure it out. Until I had a eureka moment.
Here’s the secret: it’s an image.
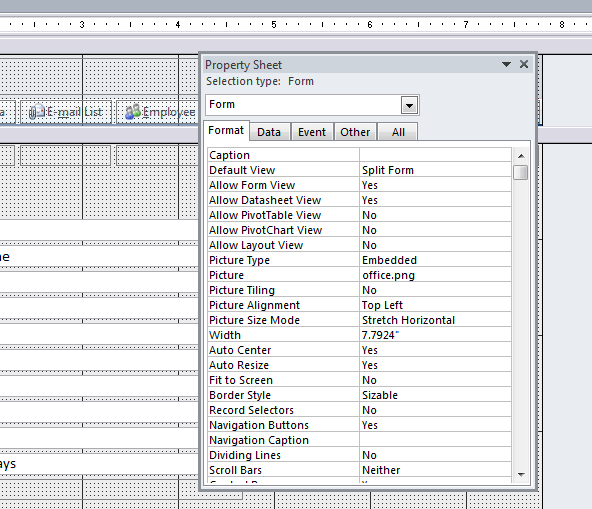 Yup. If you go into the Property Sheet of the form in Design mode, you’ll find that it is actually an image that is set up in just the right way to make it look great. The Picture Size Mode is set to Stretch Horizontal which takes the picture and pulls it to either side of the form like Stretch Armstrong. The Picture Alignment is set to Top Left or Top Right (the left or right doesn’t matter since it’s being stretched–it’s the top that’s the important part)
Which gives you a really nice way of making the form look good, right?
Except…wait…how do I get a copy of the image?
It was like know the secret of how to make fire, without have any tinder to start it. All I needed was the picture, and I would be able to give my form that look the says “A professional did this, not my nine-year-old.” Except I couldn’t. I saw that the file in the Property Sheet was called “office.png”. I scoured the web looking for a similar image and came up with bupkis.
This is where the forum post came in. (I’ll keep looking around for it and if I find it, I’ll update this post with a link back.) The post suggested using a capture tool of some sort (like the Windows Snipping Tool, or SnagIt) to grab a small part of the screen when the form is running. Save that snip, then use it as the embedded image in the form.
Oh boy oh boy oh boy oh boy! (I’m easily excited at times.)
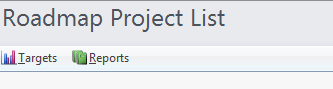
![]() I did exactly that, grabbing this image to my left. I then set the properties of my new form the same way I found them in the Microsoft template. I worked like a charm.
I did exactly that, grabbing this image to my left. I then set the properties of my new form the same way I found them in the Microsoft template. I worked like a charm.
 There are some caveats that go with this:
- If you’re going to capture the image, you’re obviously stuck with whatever color scheme you’re grabbing.
- Because it’s an image, you’re stuck with whatever height you’re grabbing. A nifty way around that would be to extend the upper part of the image with some type of cloning tool that you can find in Adobe Photoshop. But that’s getting toward a lot of work for a minor visual display.
That’s it. Have fun with your forms.

2 responses to “MS Access Geeking: Giving Your Form’s Buttons A Nicer Place To Live”
Reblogged this on SutoCom Solutions.
Be careful with this as problems such as this – http://msdynamicswiki.com/2013/01/30/displaced-lines-in-access-form-headers-in-125-or-150-display-setting/ – can occur. I usually use a box object set to the colors I want with a 1pt white border. Then set it to stretch across the top of the form. Granted you can’t get fancy gradients but it gets the job done and looks better than most of the alternatives out there.